The idea seemed right, but the execution was not quite right ... oh well
I thought that I could wrap the cutlery with orange and green tissue paper to represent a carrot. Unfortunately I could not get the desired carrot shape, but these will be a fun addition to the lunch table tomorrow anyway
Enjoy your Easter celebrations with family and friends
Judy
Thursday, March 28, 2013
Sunday, March 24, 2013
Busy weekend
Did you have a busy weekend? I sure did!
A couple of birthdays, online store to be updated, dreaded housework to be done, a little sewing
Congratulations to my nephew Ryan, he turns 18 today... HAPPY BIRTHDAY. He had a party last night and everyone was very well behaved, which is a relief when you hear of so many horror stories of young ones gatecrashing parties and causing mischief.
I remembered to take a couple of photos of my yarn eggs - I like this one of the little chick poking his head out.
A couple of birthdays, online store to be updated, dreaded housework to be done, a little sewing
Congratulations to my nephew Ryan, he turns 18 today... HAPPY BIRTHDAY. He had a party last night and everyone was very well behaved, which is a relief when you hear of so many horror stories of young ones gatecrashing parties and causing mischief.
I remembered to take a couple of photos of my yarn eggs - I like this one of the little chick poking his head out.
This one looks a little spooky with the owl eyes being quite dominant
Displayed on a platter
I think they would also look great filled with little chocolate Easter eggs, however I did not want to tempt myself, once the photo session was over
I finished sewing another 4 little wallets, two from last week have already been relocated. I just need to sew the press stud closure on these ones.
Until next time
Judy
Sunday, March 17, 2013
Sewing Time
Gosh, it was good to spend some time in the craft studio today. It has been about 2 weeks since I have sewn, and I was having withdrawal symptoms!
I needed to make a small gift bag for a family members birthday this Tuesday, so I quickly made this one from some beautiful Satin fabric. Nothing too fancy, just sew the sides, box the bottom, hem the top and then sew a ribbon to the back so that you can bring it around the front to tie a bow ... easy!
I will show you the end results once they have dried.
Hope you have been able to get some time for your favourite craft this weekend
Judy
I needed to make a small gift bag for a family members birthday this Tuesday, so I quickly made this one from some beautiful Satin fabric. Nothing too fancy, just sew the sides, box the bottom, hem the top and then sew a ribbon to the back so that you can bring it around the front to tie a bow ... easy!
Filled with goodies, ready for gift giving. Much better than a paper gift bag! Soft and flexible!
Then I decided to make some "Little Wallets". This is a pattern my sister Ann sent to me, designed by Valori Wells. These wallets have a number of uses, for your business cards, credit cards, drivers license, cash, anything you want to pop inside.
The wallet has three generous sized pockets inside, which can hold all your cards, and then keep them safe with the press stud closure.
They were such fun to make, and they may be another small gift that I can add to the Breast Cancer Drain Bags.
Also drying today, are some Yarn Eggs. These are a Easter version of my String Balls, see here.
Excuse the mess in the background of this photo ..
The yarn was strung around a small water balloon, this was great for the sizing, however it was much harder to keep the yarn even as the bottom portion is so small.
Hope you have been able to get some time for your favourite craft this weekend
Judy
Thursday, February 28, 2013
Murrumbidgee Country Quilters Exhibition
This weekend the Murrumbidgee Country Quilters will be holding their 9th Biennial Quilt Exhibition at St Mary's Hall, Edon St, Yoogali. (Near Griffith NSW).
A display of Patchwork, Quilts and Needlework made by members of the Murrumbidgee Country Quilters. Light refreshments, morning & afternoon tea available.
Local patchwork & craft suppliers will be trading during the exhibition. (Cat 'n Cart Crafts will be there, that's me)
TIME: 9.30am to 5pm COST: $5.00 entry
Open both Saturday and Sunday 2nd and 3rd March 2013
If you are in the area, come along for a visit, say hello and check out all the wonderful quilts
A display of Patchwork, Quilts and Needlework made by members of the Murrumbidgee Country Quilters. Light refreshments, morning & afternoon tea available.
Local patchwork & craft suppliers will be trading during the exhibition. (Cat 'n Cart Crafts will be there, that's me)
TIME: 9.30am to 5pm COST: $5.00 entry
Open both Saturday and Sunday 2nd and 3rd March 2013
If you are in the area, come along for a visit, say hello and check out all the wonderful quilts
![]() |
| Had to have a photo in the post! |
My sister Ann made the above quilt, based on a Amy Bradley pattern called Funny Babies which is available in my online store
Judy
Friday, February 22, 2013
Little Christmas Ornaments
1. Tea Light Snowman - utilising a battery operated tea light - turn it into a snowman face. His nose shines orange when the light is turned on
Cut out a fabric hat to fit the top of the light, sew and stuff lightly. Glue onto light and then glue a fur trim to the edge of the hat. Make sure you leave the on/off switch at the back uncovered.
Tie a co-ordinating bow and then glue it to the bottom of the light.
Paint the face as desired, I used many different expressions on my lights, just by using a permanent marker. Dot the eyes with a little white paint, and smudge the cheeks with red paint.
Glue a small magnet to the back of the light, so you can place it on your fridge etc
These battery operated tea lights are inexpensive and would make great teachers gifts.
2. Rusty Bell Reindeer - Use any size rusty bell to make this reindeer decoration
Very simple, tie a string hanger through the top of the bell, and then thread half a bumps chenille stick through. Twist around the top loop of the bell to secure. I then glued a small red pom pom on for his nose, used the black marker for his eyes, with a small dot of white paint for an accent.
A little bit of fur or jute for hair, a small button for decoration and he is finished. This is easily a decoration that your children could help make.
Can you see how the shape of the bell, determines the mouth .. I am definitely going to try some more of these, however using bigger bells ...
I also washed some beautiful mohair fleece today, it is definitely a favourite medium to use for Santa's beards, and I am lucky enough to be able to purchase it locally. The only trouble is that it has not been washed, and it is very smelly. It requires numerous washes / rinses to remove all debris and smells, but here it is, drying on some bricks in my backyard. Beautiful curls, just waiting to be used.
This is the same fleece I used for Santa's beard on the Ho Ho Ho Santa. - you just tease out the tight curls for a fluffy beard.
Till next time
Judy
Thursday, February 21, 2013
Easter Egg Mug Mats
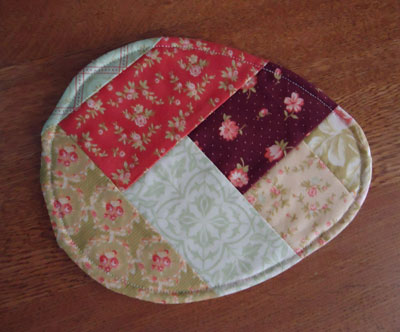
I am trying to fit some Easter craft in amongst the Christmas Santa's. I copied an Easter Egg shape out of a colouring book to get the template for these Easter Egg Mug Mats.
Just big enough to fit your mug / cup of coffee and a small treat (choc mint ball, yummy)
I then used a piece of leftover braid quilt for the top section, with a thin piece of wadding in the middle.
Just big enough to fit your mug / cup of coffee and a small treat (choc mint ball, yummy)
Remember Bill? Here he is lounging on my quilt stand ...cheeky
Another Santa is in the design stage, hope to finish him later today
Judy
Wednesday, February 20, 2013
Ho Ho Ho
This Santa was recreated from a photo seen on Pinterest from a pattern by "Soft In The Head". My friend Colleen and I created our own pattern based on the photo
He has a big fat roly poly body with big feet to support his body ... his beard is made from Angora wool, and looks so realistic. I printed the Ho Ho Ho onto Calico and then backed it with green felt. The big button is a old fashioned favourite one of mine, and looks great on this Santa.
Black beads were used for his eyes, and then a big jolly rosy nose and rosy cheeks were added .... isn't he delightful?
All these Santa's will be added to the online store closer to Christmas, but if anyone is interested they can certainly send me a e-mail for further information.
Judy
Tuesday, February 19, 2013
Another Santa - In The Bath!
This Santa is based on a "wind-up" Christmas decoration that my sister Janet owns. I thought I would see if we could reproduce it in fabrics.
Here he is, in all his naked glory in the bathtub - the bubbles / water was recreated with some bubble wrap and fine stuffing, a little bit of glitter was also added. The cute rubber duck was purchased from Target, it just adds the finishing touch! Can you see his belly button?
Now he just needed a little sign to signify his bathing routine ... Can you read it?
It says:
My bath and Christmas comes but once a year ....
Now he is a "one-off" however if I ever made it again, I would try and look for a different coloured tub to have for his bath ... unfortunately white was the only colour the discount store had in stock .... the red hessian ribbon breaks it a little bit, but I would have preferred a blue or red bath for a greater contrast! All in good fun!
I think I am now in advance with my one Christmas project a month challenge.
Judy
Monday, February 18, 2013
New Santa - February?
It is not as Prim as the pattern decrees, but I like the softer tones ... it is incredible how much bigger the head is in relation to the body.... he is quick and easy to make.
Come back again, as I also purchased a mouse and reindeer pattern in the same theme - big heads and painted eyes. So I hope to get those made shortly as well. If I leave it to closer to Christmas, they will never get made.
Judy
Sunday, February 17, 2013
Meet Bill - Easter Bunny
It is incredible when having a "like minded" crafty friend stay with you, how it gets the creative juices running.
Meet Bill -
Now Bill looks like he would be the life of the party - ho hum!
Is it Easter yet, where are all those Easter Eggs I am supposed to deliver?
Are they hiding in these bricks?
Meet Bill -
Now Bill looks like he would be the life of the party - ho hum!
Is it Easter yet, where are all those Easter Eggs I am supposed to deliver?
Are they hiding in these bricks?
Maybe in this flower pot?
OK, I give up, I will just rest here near this star until they turn up! I am feeling a bit weary.
This pattern was "tweaked" from a Threadbare Primitives pattern called Bindy The Bunny
He makes me smile, and has now taken up residence on my quilt stand - maybe he will find his Easter eggs under the quilts?
Have a great day
Judy
Thursday, February 14, 2013
Saturday, February 09, 2013
Steam Mop Cover
I recently purchased a steam mop, I love how easy it is to clean the tiled floors throughout the house. However whenever I want to use it, the pads are either dirty or in the laundry.
See the white pad above, that is the pad that came with the cleaner, it is held on with velcro strips. It gets extremely dirty, even after sweeping the floors before use.
Time to get researching, I can buy extra pads for $29.95 or I can try and make my own. I found this site, that suggested using a car mitt for a cover - definitely worth a try.
![]() |
| Photo "borrowed" from Danoz Direct website |
Time to get researching, I can buy extra pads for $29.95 or I can try and make my own. I found this site, that suggested using a car mitt for a cover - definitely worth a try.
The discount store had a lovely pink mitt for only $3.00. I unpicked one side of the mitt to begin with.
It then sort of fell into the shape I required for my mop, before I needed to do anything else
After trying it on the mop, I discovered it was exactly the size I wanted, now to tidy it up a little. No photos, sorry, I was too absorbed in getting it all together to remember to take photos of each step.
I sewed a binding along the messy unpicked edge, and then attached strips of the binding with Velcro attached to each side of the elastic strip on the back. Then I sewed the corresponding piece of Velcro to the front of the mitt for easy attaching.
Finished ... top showing how it is attached.
Bottom - see how it covers the entire base of the mop - thick and thirsty
I have given it a quick test, but a thorough testing is scheduled for today, so I will let you know if I encounter any problems with my new cover.
Cost = $3.00
Time = Approx 1 hour
Update:
The new mop cover was excellent, no streaks, and no slippage. One thing I will need to look out for in the future, the nylon interior of the new cover, pulls on the hooks on the bottom of the mop - may rip and tear with use
Judy
Friday, February 08, 2013
Garden Bench Seat
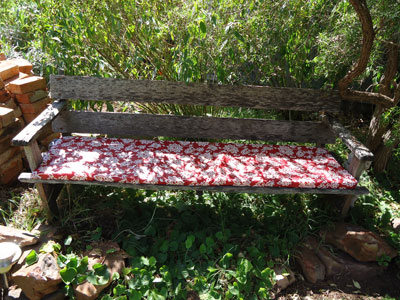
I have this lovely "old" bench seat in the garden. It is placed under a shady tea tree, but looks a little unloved
Notice that pile of bricks to the left of the photo? That is all the bricks I pulled up from the pergola floor, before it was laid with concrete.
Back to the bench, I had some pieces of packing foam that was just the right size.
An unused, flannel backed tablecloth ...
Now I was ready to make my cushion for the garden bench. I just laid the foam on top of the tablecloth.
(I did sew the 2 pieces of foam together in the middle, so that they would not move) .. I cut the tablecloth to size, and then folded over the cut side, and hand sewed that to the foam.
Then brought the other side over, and sewed that down
Now what to do with those ends?
I just imagined that I was wrapping a gift, folded in the corners, and sewed down the ends
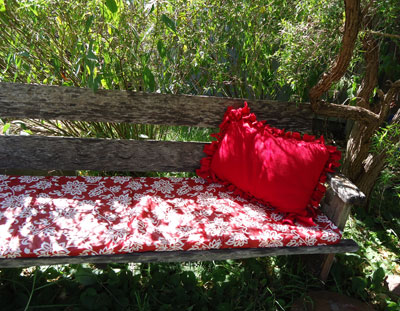
My garden bench seat is looking heaps better
Now remember that "No-Sew Cushion" I made, see here. It was the ideal cushion to make this seat more inviting
Cost = Nil
Time = Approx 1 hour
A lovely inviting seat to have my morning coffee. I do not know how the seat will handle the weather, but for a zero cost project it does not really matter.
I have a little piece of tablecloth fabric remaining, I wonder what I can do with it?
Judy
Subscribe to:
Posts (Atom)