I have reduced the steps required, yes I am lazy, however I am always looking at a easier way to do things, especially when I am making a lot of them ....
OK - instructions and lots of photos
Cut your outside fabric 5 1/8" x 6 1/2"
Cut your lining fabric 5 1/8" x 7 1/2"
With right sides together, sew down one 5 1/8" side with 1/4" seam
Bring fabric across to the other side, so both ends meet, and sew with 1/4" seam. (Notice how it will bunch up, because the fabric is not the same size)
Iron both seams open
Turn right side out. With the outside fabric facing up and making sure that you have equal amount of the lining showing on each side, iron flat. I do not measure, just guess by sight.
With the outside fabric facing, fold the short sides together - iron. This will give you a fold in the centre.
Open back out, Photo shows fold marked in red (so you can see it)
Take each of the short sides, and fold into the centre. Take care that you have the outside fabric on the inside. Press.
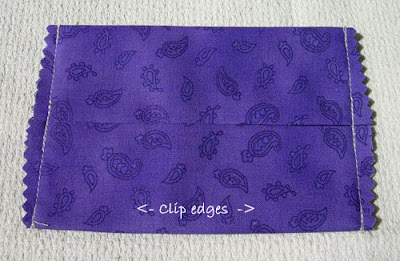
Nearly finished. With a 1/4" seam, sew both the open short sides. Do not forget to back stitch at both ends, and I also like to reverse over the centre join for added strength
Clip seams, angled close to the ends, so that we do not have bulk in the corners, when we turn it through
Turn right side out. I use a knitting needle to ensure that my corners are turned out nicely.
With tissues added
and with 30 minutes sewing, you can have all these
If you find any errors in these instructions, please let me know so that I can fix them
Have fun, making these handy little gifts
Judy


How easy are these! They look fantastic when finished and so much quicker than the original pattern. No steps missing from your instructions Judy. Many thanks for sharing your wonderful ideas with us!
ReplyDeletegreat sequence of pics....simple easy gift idea for that person who has everything
ReplyDelete