Monday, May 27, 2013

Cable Tidies

These little cable tidies came about by accident.  I went to the craft studio to grab some ribbon to tie around my power cables before packing them for holidays.  However, I saw the velcro tabs I had cut in preparation for the top opening tissue covers, and an idea came to me.

Fabric Cable Tidies


These three were quickly made with just scraps of fabric

iPhone and iPad cable tidy


Camera charger cable tidy (must take photos of the wedding)


Then I decided to make one a little longer, for the iron cord


I tried the iron cable tidy on an extension cord, but it was not long enough, so I will make one longer when I return from holidays.  Great idea to keep all the charger cables, power cords tidy.

Measurements I used, just in case someone else is interested.

The iPhone and camera charger:

4-1/2" x 2-1/2"

Iron cord tidy

6-1/2" x 2-1/2"

  • Cut two of each size in fabric and one in interfacing, round the ends, just to make it look nice
  • Iron interfacing to the wrong side of one fabric piece
  • Place wrong sides together
  • Sew all around, leaving a gap for turning
  • Turn right side out, iron
  • Top stitch all the way around the outside
  • Sew a velcro tab to each end, ensuring you sew each piece on opposite sides
  • All done

Easy, but handy.

Judy

Saturday, May 25, 2013

Wedding Wallet

Since my niece Kate and her fiance Matt already have a home together there was a request with the wedding invitation not to purchase a wedding gift. They decided to have a wishing well, where a gift of money can be deposited (with a wish) if you wanted to participate.

I thought this a great idea, but decided to put my own little touch on it, by placing my monetary gift into a little wallet.


I have some lovely wedding fabric, which was used with charcoal grey polka dot fabric


The back of the wallet


The inside of the wallet, space to put my money as well as a note to the bride and groom.

Now to come clean ... The wedding fabric was supposed to be on the inside of the wallet, the polka dots on the outside, so that it could be used at any time .... oops ... however once I realised my mistake, the wallet was already finished, and I didn't mind the finished results...  I have now made a note on my pattern to ensure that I know which piece of fabric I put down first to ensure that it does not happen again.

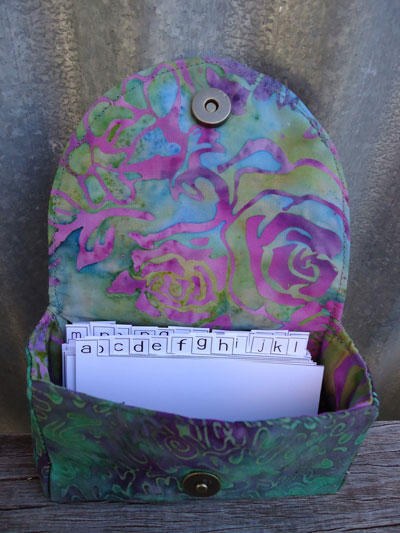
While I had the sewing machine out, I made my sister Sue (mother of the bride) a loyalty card holder as requested.  She loved the batik fabric I used for the headband, so I used some more for her holder.


I love the inside fabric


Waiting to be filled.

This is a fabulous pattern.  I wonder how many more requests I get from family at the wedding next week.

Until then
Judy

Wednesday, May 22, 2013

Loyalty Card Holder and Hairband

Today is a rainy day and I have a tradesman inside repairing some floorboards, so what's a girl to do? Retreat to the craft studio, of course.

This gave me a great opportunity to complete a couple of little projects that have been in my "to do" file.

Firstly:  Loyalty Card Holder from Christie at A Lemon Squeezy Home.


This holder has a wide base and a magnetic stud closure


Cute birdie fabric for the liner


Christie also provided downloads for the alphabet card inserts


I currently have my loyalty cards in two separate little holders, now I can put them all in the one (in order) for easy access.


As you can see there is certainly room to add more cards


All filled up with my cards. 

This was a very easy pattern and the instructions were very well explained... the holder is made with only two pattern pieces, the outside and the lining .. simple

I know for sure one of my sisters (Sue) will probably request one

Next: A Reversible Elasticised Headband from Jessica at Happy Together Creates


I must admit I did not follow the instructions supplied by Jessica, as it was so simple once you downloaded the free pattern pieces.

I used two batik FQ for this headband and used the alternate colour for the elasticised back


Unfortunately my hair is not long enough to warrant this gorgeous headband, but it will be a gift for my sister-in-law next weekend, who has beautiful thick long auburn hair ...


If she likes it, and it "works" many more will be added to my sewing list.  Did you check out the link to Jessica's blog, wasn't the patchwork one cute?

I did try this one on for size, and it was very comfortable, but as I said I have short hair, so hopefully it will just as comfortable for longer hair.

Another two little projects ticked off my list, but I will certainly be making more of each of these.

I may be missing in action for the next couple of weeks, as I am going to be holidaying in Queensland and attending my niece's wedding. 

Judy

Wednesday, May 15, 2013

Tea Wallets

My friend Belinda emailed me this pattern, she had found it on a blog but could not remember where, so my apologies to the owner / originator.

Update:  Belinda has provided the link
http://blog.westseattlefabriccompany.com/2013/01/tea-wallet-tutorial.html

The tea wallet opened, holds six tea packets easily


Then it folds up into a nice neat wallet, with a button closure


The blue and brown one above was the first one I made, and I thought it was quick and easy, however I decided to time the next one.  Yes, I was right, from the cutting out stage to completion it did not take more than 30 minutes.  This will be a great "last minute" gift idea, and you could exchange the tea packets for coffee packets if desired.

Floral Tea Wallet


Now the real reason I was in the sewing room today, was to make my dog a safety coat.  I walk of an evening, and it is now dark when I set off.  I wear a safety vest, however my dog Brandy is nearly invisible.

I purchased another inexpensive safety vest and cut it up to make his coat, which I lined with polar fleece for comfort.

Now these are not the best photos of my dog, he is desperately in need of a bath and brush, but it was only 12 degrees today, much to cold to give him a bath

Brandy is 15 years old and is commonly known as a "Heinz" variety, no real pedigree, but a wonderful companion.


Now we will both be safe, when we go for our walks

Judy


Wednesday, May 08, 2013

Rusty Barbed Fencing Wire

I visited a friend's farm a couple of weeks ago, and came home with a few rolls of old rusty barbed fencing wire as well as some farm bits and pieces.

This wire has been transformed into a heart and wreath for my garden, I must admit after many scratches later, however I am extremely pleased with the end results.

Heart:


Wreath:


On the wreath I have cut out a flower shape from rusty tin, and joined it together with a "look-alike" button in the centre.


I have also placed some "picks" around the outside - these picks were/are used to cultivate the soil.


This was a great recycling project and I have many more ideas on how to utilise this wire

Judy