Saturday, March 31, 2012

Little Notepads

While I was cleaning my workspace yesterday, I was putting away bits of card stock that I had used for packaging the "No-Slip Bookmarks" and the "Magnetic Pegs". Into the box with the stationery bits and pieces they went, when I saw some little notepads.

Out came the bits of card stock (again), with the notepads, and look what was the result:


I cut the card stock to 2" wide and approx 3 1/2" in length, folded it in half and then sewed it to the top of the notepad. Trimmed off any excess on the sides.  Embellish with a little button, and now a much nicer looking notepad.  This would pop easily into a card for a small gift.

Now if I was going to destroy a sewing machine needle by sewing through paper, I should make it worthwhile!


Ten little notepads to add to my gift box.

Judy

Thursday, March 29, 2012

Why Bother?

A couple of days ago, I posted an article about making some Magnetic Fridge Pegs

Today I was in a bargain shop and look what I found


Six very cute pegs (Made in China) for only $3.00 a pack.  They do not have the magnet on the back, but how easy would that be?

I must admit, that it took the fun out of my efforts.

Judy

Wednesday, March 28, 2012

Easter Gift Boxes

Using graphics from Sunflower Friends, I have made these little gift boxes.  Filled with mini Easter eggs.

The first featuring Vintage graphics, closed with ribbon, wool & bakers twine


The second set, are a more modern take on the Easter Bunny


These little boxes will be handed out to family and friends.  Cute substitute for Easter Eggs.  You could fill them with any type of sweet, if chocolate was not your choice.

I had planned to make some little Easter Bunnies, and fingers crossed I will get them made before Easter arrives.

Judy

Monday, March 26, 2012

30 minute craft

Do you have these items available?  Wooden clothes pegs, scrapbook paper, magnets, ModPodge, strong glue.


If you do, and also have 30 minutes of free time, you can make some Magnetic Pegs for your refrigerator.

Just cut your scrapbook paper to fit the top of the pegs (mine were 3/8" wide x 3" long)

Glue to top of peg.  I used ModPodge however you could use PVA glue. When dry, trim to size. I then applied another coat of ModPodge to the top of the paper.

Using a strong glue, glue the magnet to the back of the peg.  Use a strong magnet as you want to be able to clip paper, notes, photos etc into the peg.


For gift giving, and presentation, I glued a piece of the same scrapbook paper I used on the pegs to the bottom of a piece of card stock and then clipped the pegs on the top.


Four new gifts, all packed up in cellophane in under 30 minutes.  You have to love that!


Judy

Sunday, March 25, 2012

Scrap No-Slip Bookmarks

Continuing with my scrap gift projects, I have made a No-Slip Bookmark using just a 3" strip of fabric, a button and a hair elastic.


This just slips between the cover and the page that you are reading.  It is better than just a bookmark, as it will not fall out and lose your page.


Now, to make this gift even easier still, I made the same bookmark with a length of grosgrain ribbon.


See how it sits between the pages of your book?


Look at the difference between the pretty fabric one, and the plain grosgrain ribbon one!


All packed up for gift giving.  I just used some pretty card stock, wrapped the No-Slip Bookmark around the card and popped into a cellophane bag.  Doesn't it look pretty?


Judy

Monday, March 19, 2012

Measurements as requested

To all the lovely people that left a comment, in regards to the Emery Board Cover, the measurements follow:

Emery Board Cover ( emery board size 3/4" x 7")

Cut fabric, 14-1/2" x 4".  Fold in half length ways with right sides together.
Sew leaving a 2" gap on side for turning
Turn right side out, ensure corners are pushed out, press.
Bring one end up unto 1" from the top - sew each side close to edge.

It's that easy!  But do not hesitate to email me if you have any questions or problems

Tissue Cover

Fabric
Cut 2 x 7-3/4" x 4"
Cut 1 x 10" x 4"

Follow the instructions for the Key Ring Card Holder, just leaving out the step for attaching the keyring. Original instructions are from everything quilts

Very compact tissue cover for your handbag.

Have fun
Judy

Sunday, March 18, 2012

Emery Board Covers

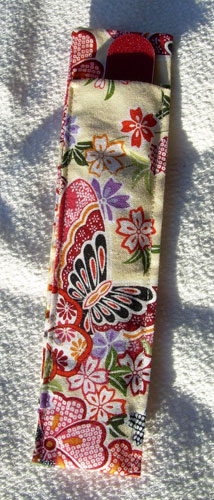
Continuing with my small gift theme, I have made some covers for a emery board.  These are great to pop in your bag to keep your emery board handy and clean.


I love this butterfly fabric - the emery board just slides into the pocket and is easy to retrieve


I needed a gift for a friends' birthday this week, so I made her a Emery Board Cover, and a Key Ring Card Holder in matching fabric


I love the fresh look of this set, hope she does as well!

Then ..... I thought, could I adapt the Key Ring Card Holder instructions to make a tissue cover? Of course I could. 


This is great for the top opening tissue covers ..


More Emery Board Covers, sorry about the photo, it was getting late in the day.


These projects are a great way to use up your scraps of fabric.
If anyone want the measurements of the Emery Board Cover or Tissue Cover, just leave a comment

Hope you had a great weekend
Judy

UPDATE:  Measurements can be found in the next post
http://cathcarts.blogspot.com.au/2012/03/measurements-as-requested.html 


Saturday, March 17, 2012

The Old and the New

While my Mum has been sorting through her belongings, we came across this really OLD handmade pincushion.  It has been made out of a tin, and has a very worn tapestry cushion.  I love it!  The tin can has been cut into long strips and curled around to form the edging.


As you can see from the bottom, it appears that the tin is quite blackened, as though it has been cooked over a open fire.  There is something stamped on the bottom, however I cannot make out what it says.


I wonder how old it is?  One of my sisters can remember Mum using it when we were children. 

Now for the new .....


New Amy Bradley Designs pin cushion - I got this pattern (Miss Pinny Cush) in store early in January, and my eldest sister Ann, made this for me.  Really bright and cheerful, fun and practical.

The sides have the words, "ouch" and "darn" appliqued on them. 


What a difference the two styles.  One practical, using what was on hand and the other pretty, using new fabrics (although practical).

I am working on some Emery Board Covers, another small gift idea.  More details tomorrow

Have a great day
Judy

Friday, March 16, 2012

I have an excuse!

You may have wondered where I have been?  I have an excuse!


On the weekend of the 3rd & 4th March we had over 200ml of rain in a 20 hour period, this came after about the same amount in the 5 days prior.  Needless to say, a lot of areas could not handle this amount of water.  Unfortunately my mothers house was one of them.  She ended up having approximately 6-8" of water throughout the house. The above photo shows the water rising in the front of her house.


Trying to pump water away from the house on Sunday.


My mother is 85 years old, and we could not get her to move out.  She was inside with us, bucketing out water, trying to move things etc.  A real trooper!  She has lived in this house for 60 years and has never been flooded before.

The family spent last week, ripping up carpet, and throwing out damaged items.  Now all we can do, is wait until everything dries out so that we can see the total extent of the damage before we can start the repairs.

Most of the Riverina area has been affected by floods. There has been major and minor flood warnings for all properties and towns along the Murrumbidgee River. Even though Leeton township is not on the Murrumbidgee River, it is surrounded by irrigation canals, and these could not handle the volume of water that we received and a lot of property was inundated with water.

Leeton shire was this week declared a natural disaster area as a result of the floods.

My thoughts go out to all that have been affected by these floods, we will survive and band together to help each other.

Note:  My home was safe and not affected by any flooding

Take care
Judy

Friday, March 02, 2012

Key Ring Card Holder

I have an addiction, I cannot seem to stop making these little keyring card holders.  They really are that easy and quick.  Great to pop your license, fuel card, debit card (cash) in with your keys.


They are an ideal gift, and a great size to pop into a card.  I have personalised two (third one ready to sew) for my sisters.  I printed out their names onto fabric and then used this as the lining.


I could not take a photo of the inside lining, and the velco closure covered up most of the top of the flap.  However here is an example of one that is waiting to be sewn (I need to purchase some white velco today) to show you what the lining looks like.


Just one strip of 3" fabric, cut into 4 pieces and you too can make one of these.  Will I share the link to the pattern, you bet!  Here it is ...Key Ring Card Holder

I think this will be what I will sew as the thank you gift for the Breast Cancer Dinner this year.  They will look great made up in the pink fabric, pretty and practical. 

Do I now admit I have approximately another dozen cut out, waiting to be sewn?  Let me know if you get hooked on making these. 

Judy

Wednesday, February 29, 2012

Post-it Notes Covers - Revisited

Do you remember in November last year when I posted about some sticky-note covers I was making for gifts?  See original post here


While I was shopping last week, I came across some mini gel pens, and wondered if I could modify the covers to incorporate the pens.  What good is having post-it notes if you do not have a pen to write with?

After a small modification to the original measurements I was able to add a little holder on the side of the cover to slip the pen into.


The original measurements were to cut the card stock 3-1/4" x 7-3/4" and then score at 3-1/8",  3/8",   3-1/8", 3/8".

The new measurements are to cut the card stock 3-1/4" x 8" and then score at 3", 3/8", 2/8", 3-2/8", 3/8".   Notice then is a extra score line.... you will need to cut two slits just between the 3/8" and 2/8" score lines at approx 1-1/8" and then up another 1-1/8". This forms the little sleeve for the pen.

If anyone would like more detailed instructions, just leave a comment and I will try and explain in more detail, and with more step-by-step photos.  The original cover idea is not my own, I have just added the amendment for the pens.

I am trying to make some small gifts to sell on my stall at the Yanco Agricultural School Gala Day on Saturday March 24th. I will also be showcasing my online stores range of buttons. There will be an exhibition of quilts  in the beautiful McCaughey mansion, which is now used as the administration area for the school, so come along for a visit if you are in the area.

Until next time
Judy

Wednesday, February 22, 2012

Where Is The Cat?

Something a little different.  I was sent this photo in a email today - with the instruction "Where Is The Cat?".  I have looked, but not yet found it, however I am assured that there is one.

Can you find it?


Let me know if you find it, but PLEASE do not say where and spoil it for others

Judy

Edited 25/2/2012 - I eventually found the cat, I had to get some hints from my readers though.

Sunday, February 19, 2012

Small shoulder bag for Sue

My sister, Sue and I were having a coffee last week in a lovely coffee shop which also sells gifts.  We were both admiring a lovely vintage shoulder bag - it was made out of crushed velvet and was adorned with lace and buttons.  Sue commented that it would be the ideal bag to take, when you just wanted to pop your keys and money (and phone, of course)  when you were going for a walk, or an evening out when you didn't need to take your handbag.

Well I did not have any crushed velvet in my stash, but it did not stop me from trying to make a bag similar.  This woolen fabric was so soft, and the purple lace went with it so well.  The lace hides the top of a pocket on the outside, which is adorned with one of my vintage buttons.


The back view - with just a lace border across the top


The co-ordinating lining - maybe next time, I will put a small pocket on the inside.


Closeup of the bag


This was just your basic lined bag pattern, no boxing of corners, just two rectangles.  I cut the outer fabric and lining 11" x 8".  The pocket size was just "eye-balled". 

I gave it to Sue this afternoon, and she loved it.  I think I would like to make a more "everyday" version, maybe replace the lace with ribbon?  It was fun (and easy)

Did you craft this weekend?

Judy

Saturday, February 18, 2012

New tissue covers

You may remember I was trying to find a pattern for the Kimono Style tissue cover that I purchased.
See here for original post. Well today, I decided to have a go at replicating it.  Not a bad effort, however a lot of work for a little tissue cover.

My version


Both versions


The obvious difference, is that I sewed the binding on by machine. (lazy?)  I think I would only make these to go with the Japanese fabric breast cancer drain bags.

While I was playing, I made more tissue covers based on the criss-cross coasters method.  I love how they turned out, and you can use up all your scraps of fabric.


Showing front and back


A couple more colour combinations.


I will definitely be making more of these - if you are interested the sizing is:

Cut 3 x   5 1/8" x 4"
Cut 2 x         4" x 4"

Follow the same instructions for the criss-cross coasters, keeping one 5 1/8" x 4" for the base.

Have fun
Judy

Wednesday, February 15, 2012

Farewell Penny

I farewelled a very good friend today .... it makes you realise how precious each moment is, and how valuable family and friends are.... take the time to tell them you love them...


These are two of Penny's paintings, she had incredible talent.  I will miss her heaps, but remember her forever.

JJ