Monday, August 15, 2011

Santa's with Dangling Legs

I have had these two Santa bodies half finished for over 9 months, with a little free time, they have been completed.  The original pattern had been "put away" therefore a modified version was created.  The little doll shoes have been weighted, so that they dangle nicely over the edge of a bench or shelf.  What do you think of their string/jute legs? Each Santa is holding a toy ready to give to the children.  They measure 24cm seating, and approx 50 cm in total height


Next on my list was a felt reindeer, he has black cross stitches across the back of his body, and a hand sculpted nose,  Rusty jingle bells are on his stick antlers, and can you see the little red cardinal bird perched on the tip of his antler?  A big tartan bow around his neck completes him


It is great to start on my Christmas sewing, and having a friend in the studio with me is the best motivation

I wonder what we will play with tomorrow
Judy


Sunday, August 14, 2011

Yummy Gingerbreads

Another Christmas project finished, a set of three cute gingerbread men (joined together).  These are made out of caramel coloured felt, and have been dusted with mica flakes and gingerbread spiced flurries.  They smell so sweet.  One of my handmade wooden signs completes the set


This will be added to the store today - $12.00 + postage. (SOLD)

I am going to finish off some string legged Santa's now, it is good to get some half finished projects completed. 

Judy

Saturday, August 13, 2011

Remember Ernie?

Can you remember when I posted this article, back in June "Still Waiting"?  Ernie was looking a little neglected.


It is amazing what can be accomplished when you have a craft friend staying, it is the best motivation to get half finished projects completed.  This is just the first of many, that I hope to get finished this week.

This is Ernie, all dressed and looking fantastic.  He is available for sale for $20.00 plus postage.  If you are interested, just send me a email.


A great closeup of his "cheeky" face


He is MUCH happier now!

Ernie was made from a pattern from The Olde Country Cupboard

Have a great crafting weekend
Judy

Friday, August 12, 2011

Something Different

Just for something different, and something that could be completed in front of the TV, I put together these three sweet snowman boxes.  They were made from a printable purchased from Sunflower Friends and are designed to be cupcake boxes.  Not sure of the cupcake, but I will certainly be able to find lots of other uses for these boxes.  I think they would look nice filled with white Christmas or some other type of homemade chocolate treat, maybe layered on white marshmallows (to reflect snow) at Christmas time. 


I also received a parcel in the mail today from the USA, from a fellow blogger who read about my alternative to using freezer paper for printing on fabric.  I explained that it was not always easy to purchase freezer paper here, especially in a small country town, and she offered to send me some.  Some, it is a HUGE roll of 75 square feet, or for us Aussies 15.2 metres.  Gosh I will be able to go mad with my printing now, however I think I will share Selina's generosity with some of my fellow local crafters.  Thank you Selina.


Have a great weekend
Judy

Thursday, August 11, 2011

Pink ribbon table decorations

My friend Sonia has made more fabric bon bons and little tissue covers for the Pink Ribbon Dinner in October.  We are going to fill them with goodies, chocolates, tea packets, mint matchbooks, all reflecting the "Pink Ribbon" theme closer to the date.

She has been able to source a variety of fabric, and they all look so cute


This is just a small sample of the ones that she made.  I will be adding the extra items closer to the date, and will share a photo when they are finished.

Thank you Sonia
Judy


Wednesday, August 10, 2011

Cards using embellishments from Store

Sister Sue has been helping to promote the new papercraft products which have been added to the store in the last month.

These cards have been created using some of the new products in store:

Happy Birthday Card - Using ribbon charm with heart (PBRC3631) and Martha Stewart bird punch ..


Floral card - Using flower embellishments, brads, ribbon and rub-ons


Happy birthday card - using a ribbon threader and vellum tags


Thank you card - using oval vellum tag  - this one is mine ... love the colours she has used, and it will be sent to a lovely lady in the USA.

Check out the store for more of these embellishments for your own card making

Judy


Tuesday, August 09, 2011

Clip Bookmarks

Just a little play time today, as I was busy preparing for a special guest to arrive.  My spare room becomes the "storage" area and a room where the clothes can be draped to dry.  With the arrival of my best friend on Friday, it was time to clear it out ...and make it look like a bedroom.

Two little paperclip bookmarks were made using Jumbo paperclips (75mm, available from your local newsagent) .  I glued a fabric brad to a large button and then glued it to the top of the paperclip.  Cut out a circle of felt to cover the back, and that is it.. this would be a great gift for a teacher, or to attach to a  gift voucher for a book store ...


Easily attaches to the pages of your book. These little gifts are great to have on standby for a quick present.

What did you make today?
Judy

Monday, August 08, 2011

Online Store updated

I have just spent the evening updating the online store with rusty tin products from the USA.  As well as wooden and cardstock shipping tags. The new core'dination core tags are quite interesting as they have a canvas like texture, and I believe you can emboss, sand and tear them.  I will have to try that for the "prim" look - I wonder how they will stain?  I will also try the distressed ink on the edges ... but what I really love about them is the metal ring around the tag hole, this will make them much stronger.


The other really cute and useful product is the foam cube christmas stamp - this will be ideal for smaller children as it is very easy to grip.  Imagine using these to stamp brown wrapping paper or white butchers paper for your gift wrap this christmas, very nice!
SOLD
Well, a lot of new products to try, so hopefully I will get a chance tomorrow

Judy


Sunday, August 07, 2011

Wonderful Weekend Away

It is always nice to take a break and I had a wonderful weekend catching up with friends in Yass .. it is a half way location for friends from Sydney.  We had a birthday to celebrate and we had organised lunch at the fabulous "Flint In the Vines" restaurant at Murrumbateman.  This restaurant is located at Shaw Vineyard Estate.  On a rainy Saturday it was a warm and cozy place to settle in for some great food.  I can highly recommend the Rabbit & Nut Terrine with English pickilily & brioche - it was yummy


Back home, and time to catch up on online orders, but the two days of R & R was great and it recharged the batteries.

Hope you also had a great weekend
Judy

Thursday, August 04, 2011

Christmas Mulberry Paper Die-Cuts

How sweet are these die-cuts for your Christmas projects.  They are designed for card making and paper crafts, however I cannot see any reason why they cannot be used for your other Christmas projects.  I can see this gorgeous Robin in the arms of a snowman... how about making a Stocking garland with the little fluffy topped stockings.  They are being added to the store this evening.


Mulberry paper has distinctive markings & texture that give it character & interest. No trees are cut down to make Mulberry Paper. The paper is made from the bark of the Mulberry Tree which peels from the trunk of the tree at the end of each rainy season - how good is that?

Judy

Wednesday, August 03, 2011

Santa's Magic Key

Imagine my delight, when I stumbled across this set of dungeon keys, I have to admit I bought 4 sets.


The two large ones measure 14.5 cm and the other two 10.5 cm. My BIL was kind enough to cut the ring so that I could use all four keys.


The two smaller keys I have used for "Santa's Magic Key".  I made a felt hang tag, with a pocket.  On the pocket I sewed a fabric printed Santa photo.  Then I used the beautiful raspberry & white bakers twine to attach the poem to the key and then the key to the tag.  I tied a little Christmas ribbon bow on the key.
The next photo shows the tag, the key & the poem, all separate


Next showing the key in the pocket, but still being able to read the poem


The little poem also fits into the pocket for safe storage though out the year.


The two Santa's Keys I have completed


 All packed up in a cellophane bag with topper for the store


Poem and Topper purchased from Sunflower Friends

Quick and easy to make, and good fun as well.  Not sure what I will do with the larger keys, maybe a accessory for a Santa (hanging from his belt?) or another variation of Santa's key maybe?  You will have to wait and see what eventuates


Judy

Sunday, July 31, 2011

Another slow day

I did start out with good intentions.  Planned to visit the local market, do a quick grocery shop and then home into the studio to start on some small gifts.  The first two, went off without a hitch, and I did find a little metal Ute car that I am going to turn into a pin cushion.... only 50 cents  - can you imagine the tray part as a pin cushion, looking like a covered load?  It is in such good condition.

When I returned home, that is when all my plans went amiss.  I had just put the groceries away, when the power went out.  It was not isolated to just my home, the whole township was without power. No sewing machine, no glue gun, no lights, no computer ... what a shame.

However I did get a little bit of gardening done, which was a bonus as it has been neglected, like everything else lately.

Power was returned at approximately 4:30 pm - just enough time for me to make a Magnetic Fabric Photo Frame so that I could say that I had made at least one thing.

This is just a little quilted frame with two diagonal ribbons sewn in, so that the photos can be interchanged.


Hard to see ribbons in this photo

Back with magnetic strips glued on
I glued magnetic strips on all sides, so that you can position your photos vertical or horizontal.  I think this would be a great gift for grandparents, to easily display photos of their grandchildren on the fridge.

Sister Sue made a black & white 21st card, using one of the new Delish Bistro Keys that have been added to the store this week.


Hope you have had a really crafty weekend
Judy

Saturday, July 30, 2011

Craft Drought

It has been over two weeks since I have been in the craft studio.  My online business has been keeping me busy (no complaints) however it has been taking up too much of my "play" time.

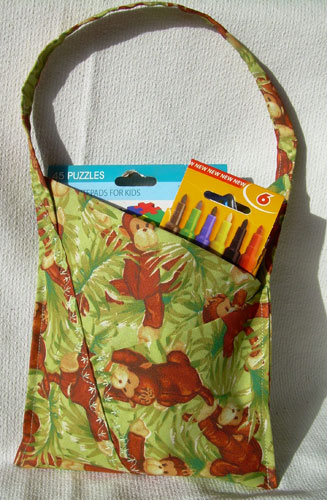
Today I set a couple of hours aside to make two small gift bags - these bags are based on one fat quarter only - see original post here.  These will be filled with little gifts for children.  Cute little monkey print.


Photo showing secret pocket
 The next used a dog print, although a lot of the design was lost when completed.  Hope the little boy still likes it.

Girly goodies for display only

Inside pocket big enough for a DVD
I am going to make a stash of these in all designs, to have on hand for gifts. You can fit so many things inside all the pockets.

I still have to make a gift for the "Sew Many Ways" "Make a gift on the 25th" so fingers crossed I will be able to get started on that tomorrow.  I am planning to start on small gifts for my co-workers.

Well, I had better get back to updating the online store with new products, and then they can be put away and my office can get back to normal (ie being able to see some floor space)

Hope you are having a great weekend, it has been a beautiful winters day here, with the sun shining brightly and allowing all the washing to dry naturally (for a change).


Judy

Tuesday, July 26, 2011

M.I.A.

This title has two meanings:

1.  Missing In Action (which is what this post is about)
2. Murrumbidgee Irrigation Area (the region in south west NSW, Australia, where I live)

I had an unexpected 5 day medical emergency, which resulted in a visit to hospital.  It is times like these I am extremely thankful for my wonderful family and friends.  My sister Janet was a rock, she was there with me the entire time.  I am not the best patient, so to have that support was very reassuring.

Home now, and will be back in action, but unfortunately I missed my first "make a gift on the 25th" commitment.


I will try and make up for that this week, as well as catch up on all the other things that I have not done.
Facebook, Blog, Online Store all waiting for updates, not to mention the many household chores - (and I had a competition running for my mailing list readers) oh well -  everything always gets done, maybe just not when they should have been done.

Hope you are all in good health
Judy

Tuesday, July 19, 2011

Great idea for printing on fabric

It is amazing how kind our fellow bloggers are! A lovely lady, Selina,  from the other side of the world (or nearly, in the USA), left a comment on my blog post about printing on fabric.  She also left a link to her blog Selina quilts showing what she had made from printing on fabric.  Go across and check out her blog, get inspired, and let her know where you come from ....

Here is a photo from her blog to tempt you ... they are so cute and personal

Photo used with permission from Selina Quilts

I will be busy the next couple of days uploading products to my online store, however hope to get into the studio at least for a little while.

So many ideas, so little time

Judy


Saturday, July 16, 2011

Two Bags Completed

Remember when I gave you the hint about printing on fabric, and I had these?


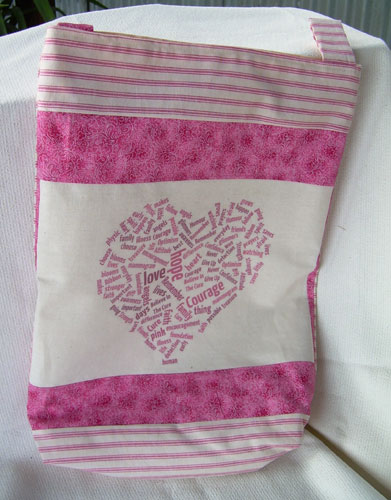
Last night, I made two of them up into Breast Cancer Drain Bags, and am very happy with the results


What craft are you going to be doing this weekend?  What are you making?  Let me know.

Judy


Friday, July 15, 2011

Cards - printed fabric embellishments

Cute Christmas Cards using printed fabric embellishments.  This one also incorporates a recycled business card behind the Joy lettering.


Trying the same technique on the recycled business cards.


Oops, just realised that I had not put the hangers on these tags ... better go and do that now before I forget.

Have a great weekend
Judy


Wednesday, July 13, 2011

More playing - fabric and tags

I have continued to experiment with the recycled business cards and printing on fabric.  In some cases combining the two.

As I did not have a variety of Christmas stamps to add greetings onto the business card tags, I thought I would try printing some out onto calico.   I just created a table in Microsoft Word and entered in "one word" sayings.  Printed onto fabric, and then cut and glued them onto the tags.  Add some cute Christmas buttons and this is the result


Not one to be faint hearted, I decided to see how a larger coloured graphic would work in the printer.

I had downloaded a prim stocking pattern from The Olde Country Cupboard, which included a page of prim Santa photos.  So off to the printer I went, with my calico attached to the cardboard.  SUCCESS.

Here is a photo of a small Stocking Ornie I made from felt with a small printed Santa  graphic.  Next time I will make them more prim and with fabric as shown in the pattern, however the felt, bakers twine etc were still out on the studio table, so I used them


So much fun,

Until next time
Judy

Monday, July 11, 2011
Little Tissue Holder - link to tutorial

My readers have been requesting that I give a tutorial on the little tissue holders that were featured in these two blog posts.

http://cathcarts.blogspot.com/2011/07/breast-cancer-drain-bags.html
http://cathcarts.blogspot.com/2011/07/bonbons-for-cause.html

I have been procrastinating about this, as it was not my pattern to share, but as luck would have it, we have found the designer.

The very talented Clare Bower from Clare's Craftroom - here is the link to her instructions.

The only changes I make are to use three pieces of fabric, cut 8" x 5", placed on top of each other, and treat as one - this is to give stability to the holder.  Good opportunity to use scraps of fabric as the middle two are not seen.

To save time & money, I usually just sew the 1" folds down with a decorative stitch, although my friend Sonia does sew ribbon on at this stage.

Any questions / problems, just ask and don't forget to go across to Clare's Blog and say thanks ...

Judy