Monday, November 26, 2012

Candy Cane Reindeers

This is a fun craft to make with your children or in the classroom.  Candy Cane Reindeer.  This is not my idea, it was found on Pinterest.

 
I purchased a pack of chocolate and vanilla flavoured candy canes which I thought were more appropriate for children than the peppermint flavoured ones.  Tied some brown wool around the top of two candy canes and then stuck a red "Rudolph" pom pom nose and googly eyes on to finish them off.  Easy!


My sister was going to visit my "crafty" nieces and nephews on the weekend, so I made up some kits for them to complete these little reindeer.  I always include extra "little" bits in the kits when making them for children, just in case they drop / lose some parts.  In this case, an extra set of eyes, and 1 more pom pom nose was popped in. 
 
 
Two little 2013 diaries were transformed with a "fun" cover.  I think I need to keep this next one for myself!
 
 
Or maybe even this one?
 
 
These have been placed in a cellophane bag with a little label on the back
 
 
I think these are going to be popped into a gift bag with a gift voucher for some family members.  Just for fun!
 
I like making small fun gifts, do you?
 
Judy

Sunday, November 25, 2012

Little Christmas Gifts

A lot has been happening around my house, and unfortunately not a lot of craft ...  I am getting a new pergola floor which is the entry to the craft studio, therefore I have been unable to get into the studio.  The concrete slab is being poured on Monday, so it will be a few more days yet, although I am really looking forward to it being completed. 

I did get to finish off the Hand Santa-isers for my sister-in-law.  Eight completed.


Then I played with the larger sized hand sanitisers - I printed out some free Christmas sayings onto transparency plastic and inserted it into the bottle.  I like how it turned out.  Two different designs.
I removed the label from the front of the bottle, but kept the one on the back, so that recipients would know what was in the bottle.  Tied a Christmas ribbon around the top, all done!


Lastly I wrapped some purchased soap, for filler gifts.  I used goats milk soap which is fragrance free, so that it is suitable for all recipients.
 
 
Using scrapbook paper and embellishments, they now look entirely different.
 
 
Have you been making some Christmas gifts?
 
Judy

Friday, November 16, 2012

Hand Santa-tiser


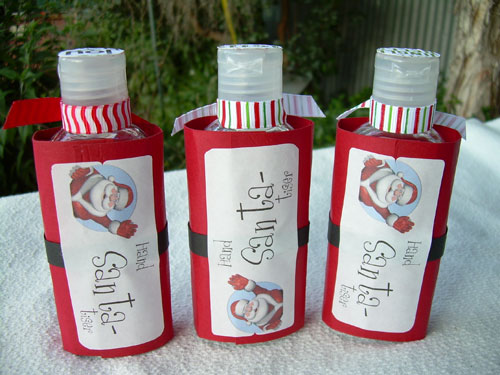
These cute Hand Santa-tiser gifts were made from a idea I saw here.  They are so simple to make!
 
I started out with a mini bottle of hand sanitiser


Wrap the bottle with red cardboard and secure at the back with double sided tape.  Glue some white textured card down the front.  I had some embossed snowflake card, so I used that.
Next make Santa's belt out of black cardboard onto which you have threaded a buckle.  Secure this again at the back where it will all be covered up with a label.
 
I did take photos of these steps, however they were too bad to use, but they are not really needed.  Just by looking at the finished item you can see how to do it.
 
 
To finish off, I printed a label using a Santa clip art graphic from Microsoft Word and adhered that to the back, so it covers up all the joins from the cardboard.


Tie some Christmas ribbon around the neck of the bottle and cover the top of the bottle with some Christmas paper.  These have just been punched out using my 1" circle punch.
 
 
These would make great gifts for teachers or co-workers.  These three (with another three, that I have yet to make) have been ordered by my sister-in-law for her children's teachers..
 
 
Enjoy
Judy

Thursday, November 15, 2012

Me today

Image source here

Judy

Tuesday, November 06, 2012

Advent Ideas - Wrapped Mini Chocolates

I am still on a "chocolate" theme for advent gifts.  Our local dollar store had this packet of Hershey Miniatures.  There were approximately 40 mini chocolates in this pack - great value.

 
Now see what they look like, just wrapped in some pretty Christmas Scrapbook paper.  I placed three minis in a cellophane bag, and made a topper out of more scrapbook paper.  I think they look great! They needed a contrast piece of scrapbook paper behind, so that they did not look "lost" in the bag as it was not an exact fit. 
 
 
I made up all the chocolates in the pack (so that I would not be tempted to eat any, he he) into these sets.

I am not sure how many I should set aside for my friend's advent gift, but the rest will be used as extra gifts at Christmas... maybe even pop one in each of my co-workers gifts.  Another good gift idea for Teachers.
 
Now I am working some magic with this little bottle of hand sanitiser ... stay tuned


Judy

Saturday, November 03, 2012

Advent Ideas - Chocolate Bon Bons

I have started on the advent gifts for my friend, so hopefully over the next few days I will be able to show you what I have been making.  I know my friend visits my online store often, however I do not think she visits the blog.  Fingers crossed, that I can keep most of them a surprise for her.

I picked up three tubes of Smarties from our local discount store - they weigh 170g and measure approx 10" in length.  Only $3.00 a tube

 
I thought they would make great Christmas Chocolate Bon Bons.  So I wrapped them in Christmas scrapbook paper, then in cellophane paper.  Tied off each end with cute Christmas ribbons.  Then embellished  with things that I had on hand.
 
 
One of these will be going into into my friends Advent gifts.  One belongs to my sister, she was with me  when I purchased them, and the last one will be a spare Christmas Kris Kringle gift.
 
I have tried to take a close up photo, however as they were so long it was difficult, but hopefully you will be able to see how effective they are.


This would be a great idea for a Teacher gifts as well.  Quick, easy and inexpensive which we all love at this time of year. I think it is hard to find someone that does not like chocolate (I wish I didn't!)
 
Enjoy your weekend
Judy

Monday, October 29, 2012

Halloween Goodie Bags

The orange tic tacs were transformed into Halloween Treats just by covering them in black card stock


I used the same measurements for the cover as used previously (see here)  tied off on the side with some Halloween coloured ribbon, added a free printable graphic... all done

I am loving what can be done with decorating a packet of tic- tacs, I am already brainstorming how I can use them for Christmas gifts.

All that was needed for the next lot of little Halloween treats was to print out some mint books ...these were free downloads from Pattywraps.

 
The Creepy Crawly mint book was filled with a little packet of maltesers, and the witches leg mint book was filled with a small packet of M&M's.  I think the children will like these treats.
 
 
All the goodies were then placed in a Halloween themed treat bag.  Can you see what I have forgotten to add before this photo was taken?
 
 
I forgot, the witchie poo lollipop holders, and the tic-tacs.  I did remember to put them in the bag before I tied it off.
 
 
All the treats placed in the bag, tied off with a tag and a spooky eye.
 
 
These three bags are being sent off to my nieces and nephew.
 
I placed all these goodie bags plus the Halloween Hand Treat bags in a mailing box which I had decorated the lid with a Halloween graphic and some spooky decorations.
 
 
I wrapped the gifts in some spooky spider weave type fabric under which I had layered some spiders .. scary
 
 
I hope I will not get blamed for any nightmares next week.  They are already in the post so should arrive in time for Halloween.  Hope they like them?
 
Now to start on Christmas gifts.  My best friend and I decided to exchange advent gifts, and I must admit I have not really started on mine (yet).  They need to be delivered by the 1st December, so I had better get busy.  Not sure if all will be handmade, but I will try my best.  Maximum spend is $5.00 so if anyone has any ideas, they would certainly be appreciated.  My friend is a very crafty lady and loves Christmas as much as I do.
 
Christmas is coming much to quickly and I need to get more organised.  All the trade shows are finished for the year, so I have no excuses, however I am sure I will be able to think of some.
 
Until next time
Judy

Sunday, October 28, 2012

Final - Pink Ribbon Dinner

Our annual Pink Ribbon dinner was held successfully over the last two evenings, a great night with lots of fabulous food, fun and fundraising.  I was even lucky enough to win a massage voucher.

All the pink ribbon gifts were welcomed (and praised) from the guests, and I also received a certificate of thanks.  This will look lovely framed on the wall in the craft studio.

 
The ladies on my table, loved the little gift bags I put together for them, and they even shared the spare gifts between them at the end of the evening.


Now I have 12 months to think up another idea for "thank you" gifts.
 
I have not forgotten the orange tic tacs, they are nearly complete and I will be able to share the end results with you very soon. 
 
Judy

Monday, October 22, 2012

Another idea

While I was looking at the "Sew Many Ways" blog, I discovered another version of the Halloween Glove Treat Bag - check out this site for the information on their version.  Very easy!  These look like gnarly, old hands....creepy ...

Photo is from High Heels & Grills Blog

 
I am not sure if candy corn pieces are available in Australia, I know they are not available in my little town, but you could use the fake witches fingers to get a similar result.
 
I did not get a chance to have any craft time with my nieces and nephew over the weekend, so I will have to make up a halloween parcel (with the treat bags included) and sent it to them ... they will love getting a parcel in the mail.
 
Take care
Judy

Friday, October 19, 2012

Halloween Treat Bags

When I was in the supermarket this morning, I loaded a lot of chocolate treats into my basket.  I am sure the checkout girl, thought I was really going to have a "binge"!

 
These are a few of the goodies that I purchased to make a "quick and easy" Halloween treat bag.
 
1. Disposable Gloves
2. Long slender sweets to put into the fingers of the gloves
3. More sweet treats for the hand portion
4. Fake witches fingernails
5. Scary Ring


This is the finished product, scary?  I have placed a little cobweb type fabric in the top of the glove and then tied it off with a ribbon and a scary creature.  What looks like an eye in the creature is actually a dot on the ribbon, I like how it turned out.
 
This took about 5 minutes to put together and will be a great Halloween project for your children. I have only made the one and I am going to leave the rest for my nieces and nephews to make.  They may be visiting this weekend, and as I am "supposed" to be busy preparing for a trade show on Sunday I will not have time to have a craft day with them.
 
I can supply all the materials, and let them make their own treat bags for their friends.
 
I also purchased some orange tic-tacs and think I will play with them next week to make a Halloween version of my pink ribbon tic-tacs.
 
 
Until next week
Judy

Thursday, October 11, 2012

Halloween Treats

Halloween is not really celebrated in Australia, although we do get some children in my neighborhood dressing up and coming to the door trick or treating!

I usually just get some store-bought candy, but this year, time permitting, I am going to put together some treats myself.  This is a trial run, and these ones will be going to my nieces and nephew.

Here we have witchie-poo lollipop holders and mummy chocolate bar covers. Both are free printables from Laurie Furnell - click here to see her blog.


1.  Cute little mummy wrappers - these are so cute they would not scare anyone!

 
I have resized this graphic to fit around the very small children's Cadburys chocolates.  You buy them 5 in a pack, usually with animal graphics on the front. (I did not take a photo before wrapping)
 
 
2. Witchie-Poo Candy Holder - a very cute colourful witch
 
 
These have been printed on card stock, I could fit 3 onto one page.  I then cut a slit in the arms and threaded a Allens lollipop through to look like she was holding it.  You could laminate these if you wish, however I thought for the time it would take it would not be worthwhile.


Now to find out what else I can make up for Halloween.  There are so many generous talented people on the web that freely share their designs and ideas, we are so very lucky!
 
Judy

Wednesday, October 03, 2012

Pink Ribbon Gifts - 2

Remember I said that I had an idea about using these?

 
See what they look like now?
 
 
I really love how they turned out, quick and easy as well, which is a bonus.
 
These are the small packets of tic tacs, and I cut my cardstock 2-1/2" x 4-1/2".  Scored at 1/2" and then at 2-1/8".  Then I measured from the opposite end 1-5/8" and scored again.  It ended up looking like this.
 
 
The little 1/2" section wrapped around the side of the pack.  I used a 1" circle punch to cut out the hole.  No actual measurements, just lined it up in the middle, and punched.  The snowflake was punched using a Martha Stewart snowflake punch, and then a little rhinestone added to the centre for accent.
 
Using the same breast cancer printables from Chickabug (see here) I used a glue dot to attach to cover, just overlapping the hole a little bit and ensuring that you catch the ribbon underneath.
 
Tie the ribbon off in a bow on the side ...
 
 
Ten completed - what is next?
 
 
Judy